Halo Light
LED strip lights can fail without warning: one evening, a kitchen counter glows evenly; the next, a section flickers or stays dark. Before replacing the entire strip, check the power adapter, controller, connectors, and visible copper pads. These small parts often explain why do led strip lights stop working, even when the LEDs themselves remain intact. Start with the simplest clue: does the strip fail everywhere, or only beyond one connection?
The U.S. Department of Energy’s Energy Saver guidance says residential LEDs use at least 75% less energy and can last up to 25 times longer than incandescent lighting. That comparison concerns LED products generally, not a guarantee for every strip, power supply, or installation. A long advertised lifespan cannot prevent a loose plug, overloaded adapter, damaged cut point, or moisture near an exposed connection. Details matter. In this guide, we’ll trace symptoms to likely causes, then cover safe checks and practical repair options. Unplug the power supply before touching wiring, and replace components only with compatible voltage and current ratings. If a connector looks scorched, or the adapter smells burnt, stop testing and replace it with a properly rated part. A multimeter can help confirm whether voltage reaches the strip, but readings require care and the right settings. Not every fault has a tidy fix; sometimes the cheapest-looking repair is unreliable. A cautious diagnosis is usually better than guessing.
Identify the strip before replacing parts. A 12- or 24-volt constant-voltage strip usually has repeated cut marks and connects to a power supply. Addressable strips have a data line, and one failed pixel may interrupt colors farther along the run. COB strips show a continuous band of light; many SMD strips reveal individual points. Check the label, wire count, controller, and power-supply output. Unplug the system before inspecting connections.
Symptoms offer clues, but they are not a diagnosis. A completely dark strip may indicate a loose connector, failed supply, or reversed polarity. Flickering can point to a poor connection or overloaded supply. A dark section beside working LEDs may mark a damaged cut point or failed segment. Color shifts and dimming can also result from heat or voltage drop, especially near the far end of a long run. Real repairs are messier. I have seen a simple connector fault look like a dead strip.
The U.S. Department of Energy’s 2011 report, LED Luminaire Lifetime: Recommendations for Testing and Reporting, describes L70: the point when light output reaches 70% of its initial level. That is not the same as sudden failure. IES LM-80 testing measures LED-package lumen maintenance over at least 6,000 hours, while TM-21 projects maintenance from test data. These figures describe LED sources, not every connector, controller, or power supply in a complete strip system. Check those parts separately.
How to Fix LED Strip Lights That Stop Working
When a strip goes dark, check its power supply before replacing anything. Unplug it first. Read the supply label and compare its output voltage with the strip’s required voltage. A mismatch can cause flickering, weak brightness, or no light at all. Check that the adapter is firmly seated in the wall outlet and that its cable is not sharply bent, frayed, or unusually warm. If you use a dimmer or controller, temporarily remove it only if the connections are designed to allow direct testing. Never force a plug into a connector. Small differences in polarity matter.
Inspect every connection, especially near corners and cut marks. Look for loose clips, exposed copper, dust, or a connector that has shifted sideways. Reseat the strip gently while the power is disconnected. Then reconnect it and test a short section. If only one section stays dark, a damaged cut point or poor contact may be responsible. Check the controller next: confirm its input and output plugs are in the correct ports, then try its power button or reset procedure. I sometimes rush past the connector check; it is easy to blame the strip too soon. If the supply becomes hot, smells burnt, or has damaged wiring, stop testing and replace it with a correctly rated unit.
Check the power supply, connections, and controller. Start by measuring the supply’s DC output and comparing it with the strip’s rated voltage.
The values shown are nominal system voltages, not troubleshooting measurements. Check the strip or power supply label, then measure the supply output with a multimeter. If the voltage is absent or substantially below its rating, inspect the supply and connections; if it is correct, check the controller and strip.
Disconnect the strip before inspecting it. Look for dark LEDs, torn copper pads, loose connectors, or sharp bends. Mark the first section that looks damaged. LED strips often have cut marks between repeating sections; use those points to isolate a fault without cutting through a circuit.
Check the power supply label and confirm its output voltage matches the strip. Then test the strip with a compatible, known-working supply. Keep the connection polarity correct, and avoid touching exposed contacts while powered. If only part of the strip lights, switch off the supply and reconnect one section at a time, starting near the input. Note where the lights stop responding. That boundary is a useful clue.
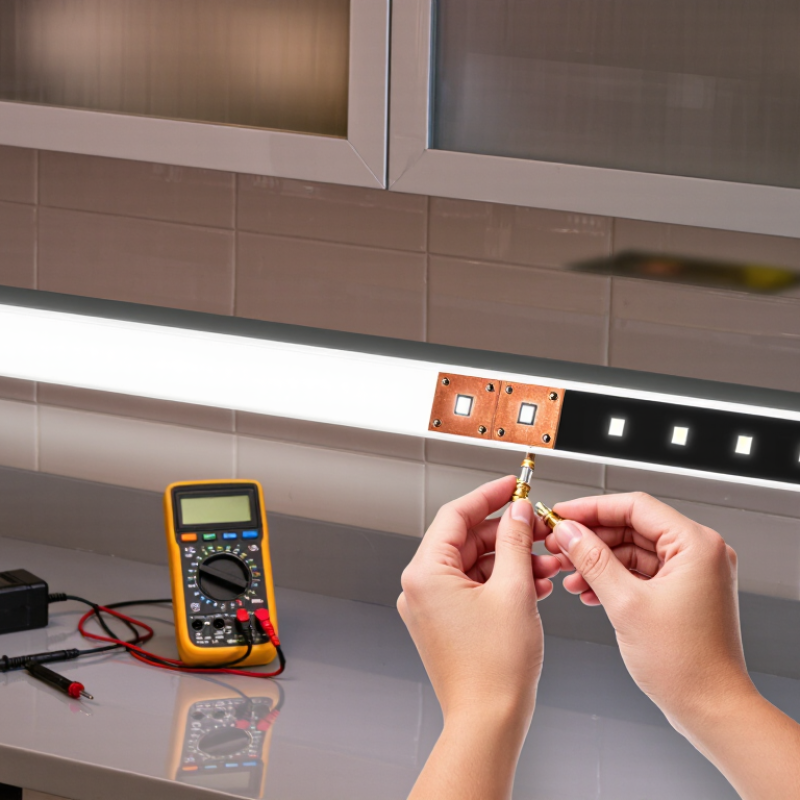
A multimeter can help confirm whether voltage reaches a dark section, but use it only if you know how to measure low-voltage circuits safely. A poor probe contact can give a misleading reading. This test is not perfect: a connector may work intermittently when moved. Wiggle it gently only after power is off, then check for looseness or corrosion. A little uncertainty is normal; repeat the test before replacing a section.
When LED strip lights stop working, inspect the damaged area before buying replacements. Unplug the power adapter and let the strip cool. Check for loose connectors, crushed sections, dark spots, or lifted copper pads. A strip that flickers near one connector may have a poor contact, not a failed power supply. Still, avoid guessing. Compare the adapter’s output voltage with the strip’s label, and never open the adapter housing.
Replace damaged sections only at marked cut points. Use a compatible connector, or solder only if you have the right tools and experience. Keep polarity aligned; reversed connections can prevent the strip from lighting. Replace sections with cracked insulation, exposed copper, corrosion, or signs of water damage. Don’t cover damaged wiring with tape and call it repaired. That shortcut can hide a real hazard. I’d rather replace a short section than trust a questionable joint.
Tips: Disconnect power before touching any contacts. Test the repaired strip briefly on a dry, nonflammable surface. If the damage reaches the power adapter or you are unsure which part failed, stop and ask a qualified repair professional. Small details matter. Sometimes a repair looks fine, then flickers again.
After replacing a connector or power supply, test the entire strip before reinstalling it. Reconnect power only when exposed conductors are insulated and the area is dry. Check every color setting, dimming level, and controller response, not just the first flash of light. Look for dark sections, pulsing, or a connector that becomes unusually hot. Small clues matter. Note what you see.
Run the strip at its normal brightness for 20 to 30 minutes, then inspect the repaired joints again. A repair can look convincing and still be unreliable. Check that the power supply’s output voltage matches the strip’s requirements and that its current capacity is sufficient. Confirm connector polarity; a reversed connection may prevent operation or cause damage. Disconnect power before changing a connection.
To prevent repeat failures, avoid sharp folds and tight bends, which can stress the copper traces. Keep the strip away from moisture unless it is specifically rated for that environment. Leave space around the power supply for airflow, and secure cables so they do not pull on soldered joints. Dust can trap heat, so clean the area gently when power is disconnected. If the strip keeps flickering or any part overheats, stop using it and replace the damaged component rather than repeatedly testing it.
Disconnect power and inspect for dark LEDs, torn copper pads, loose connectors, or sharp bends. Mark where the light stops; that boundary can help locate the fault.
Compare its output voltage with the strip’s label. You can also try a compatible, known-working supply. Keep the polarity correct.
Yes, if you know how to measure low-voltage circuits safely. Poor probe contact can produce a misleading reading. Not always clear.
Disconnect power before checking it. Gently inspect for looseness or corrosion, then reconnect one section at a time to locate the problem.
Replace sections with cracked insulation, exposed copper, corrosion, or water damage. Use marked cut points and a compatible connector. Don’t hide damaged wiring under tape.
Test the entire strip on a dry, nonflammable surface. Check its colors, dimming, and controller response, then run it at normal brightness for 20 to 30 minutes.
Stop if it keeps flickering or any part overheats. A connector that becomes unusually hot needs attention. Repeated testing is not a repair.
Avoid sharp folds, keep the strip away from moisture unless rated for it, and leave airflow around the power supply. Secure cables so they do not pull on joints. Dust can trap heat.
When LED strip lights stop working, begin by identifying the strip type and noting exactly what has failed: the entire strip may be dark, only one color may be missing, or a section may flicker. Understanding these symptoms can help explain why do led strip lights stop working and guide a safer diagnosis. Check that the power supply matches the strip’s requirements, then inspect plugs, connectors, wiring, and the controller for loose connections or visible damage. Turn off and disconnect power before handling any parts.
If the connections appear sound, test the strip in sections to narrow down where the fault begins. A damaged segment or connector may need careful repair or replacement; replace parts only with compatible components, and do not use anything that appears unsafe. Once the repair is complete, reconnect the system and check that the full strip lights evenly and responds as expected. To help prevent future problems, avoid overloading the power supply, protect connections from moisture and strain, and keep the strip within its recommended operating conditions.